HTML (Hypertext Markup Language) is not a programming language. It is a markup language that tells web browsers how to structure the web pages you visit. It can be as complicated or as simple as the web developer wants it to be. HTML consists of a series of elements, which you use to enclose, wrap, or mark up different parts of content to make it appear or act in a certain way. The enclosing tags can make content into a hyperlink to connect to another page, italicize words, and so on. For example, consider the following line of text:
<p>My cat is very grumpy<∕p>
Output:
My cat is very grumpy
Let's further explore our paragraph element from the previous section:
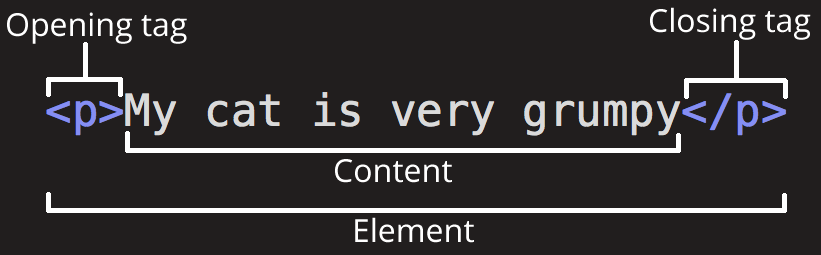
The anatomy of our element is:
- The opening tag:This consists of the name of the element (in this example, p for paragraph), wrapped in opening and closing angle brackets. This opening tag marks where the element begins or starts to take effect. In this example, it precedes the start of the paragraph text.
- The content:This is the content of the element. In this example, it is the paragraph text.
- The closing tag:This is the same as the opening tag, except that it includes a forward slash before the element name. This marks where the element ends. Failing to include a closing tag is a common beginner error that can produce peculiar results.
The element is the opening tag, followed by content, followed by the closing tag.
Edit the line below in the "Editable code" area by wrapping it with the tags<em> and <∕em>.To open the element, put the opening tag <em> at the start of the line. To close the element,put the closing tag <∕em> at the end of the line. Doing this should give the line italic text formatting! See your changes update live in the Output area. If you make a mistake, you can clear your work using the Reset button. If you get really stuck, press the Show solution button to see the answer.
Elements can be placed within other elements. This is called nesting. If we wanted to state that our cat is very grumpy, we could wrap the word very in a <strong>element, which means that the word is to have strong(er) text formatting:
<p>My cat is <strong> very <∕strong> grumpy <∕p>
There is a right and wrong way to do nesting. In the example above, we opened the p element first, then opened the strong element. For proper nesting, we should close the strong element first, before closing the p . The following is an example of the wrong way to do nesting:
The following is an example of the wrong way to do nesting:
<p>My cat is <strong> very grumpy.<∕p><∕strong>
The tags have to open and close in a way that they are inside or outside one another.With the kind of overlap in the example above, the browser has to guess at your intent. This kind of guessing can result in unexpected results.
There are two important categories of elements to know in HTML: block-level elements and inline elements.
- Block-level elements form a visible block on a page. A block-level element appears on a new line following the content that precedes it. Any content that follows a block-level element also appears on a new line. Block-level elements are usually structural elements on the page. For example, a block-level element might represent headings, paragraphs, lists, navigation menus, or footers. A block-level element wouldn't be nested inside an inline element, but it might be nested inside another block-level element.
- Inline elements are contained within block-level elements, and surround only small parts of the document's content (not entire paragraphs or groupings of content). An inline element will not cause a new line to appear in the document. It is typically used with text, for example an <a> element creates a hyperlink, and elements such as <em> or <strong> create emphasis.
Consider the following example:
<em> is an inline element. As you see below, the first three elements sit on the same line, with no space in between. On the other hand, <p> is a block-level element. Each p element appears on a new line, with space above and below. (The spacing is due to default CSS styling that the browser applies to paragraphs.)
Not all elements follow the pattern of an opening tag, content, and a closing tag. Some elements consist of a single tag, which is typically used to insert/embed something in the document. For example, the <img> element embeds an image file onto a page:
<img src="https://raw.githubusercontent.com/mdn/beginner-html-site/gh-pages/images/firefox-icon.png">
This would output the following:
Elements can also have attributes. Attributes look like this:

Attributes contain extra information about the element that won't appear in the content. In this example, the class attribute is an identifying name used to target the element with style information.
An attribute should have:
- A space between it and the element name. (For an element with more than one attribute, the attributes should be separated by spaces too.)
- The attribute name, followed by an equal sign.
- An attribute value, wrapped with opening and closing quote marks.
Another example of an element is <a>. This stands for anchor. An anchor can make the text it encloses into a hyperlink. Anchors can take a number of attributes, but several are as follows:
- href: This attribute's value specifies the web address for the link. For example: href="https://www.mozilla.org/".
- title: The title attribute specifies extra information about the link, uch as a description of the page that is being linked to. For example, title="The Mozilla homepage". This appears as a tooltip when a cursor hovers over the element.
- target: The target attribute specifies the browsing context used to display the link. For example, target="_blank" will display the link in a new tab. If you want to display the linked content in the current tab, just omit this attribute.
Sometimes you will see attributes written without values. This is entirely acceptable. These are called Boolean attributes. Boolean attributes can only have one value, which is generally the same as the attribute name. For example, consider the disabled attribute, which you can assign to form input elements. (You use this to disable the form input elements so the user can't make entries. The disabled elements typically have a grayed-out appearance.) For example:
<input type="text" disabled="disabled">
As shorthand, it is acceptable to write this as follows:
<!‐‐ using the disabled attribute prevents the end user from entering text into the input box ‐‐>
                <input type="text" disabled>

                <!‐‐ text input is allowed, as it doesn't contain the disabled attribute ‐‐>
                <input type="text">
If you look at code for a lot of other sites, you might come across a number of strange markup styles, including attribute values without quotes. This is permitted in certain circumstances, but it can also break your markup in other circumstances. For example, if we revisit our link example from earlier, we could write a basic version with only the href attribute.
All the documentation in this page is taken from MDN
All the documentation in this page is taken from MDN
All the documentation in this page is taken from MDN
All the documentation in this page is taken from MDN